This article discovers opportunities presented with the new feature for Cintoo Connect - Unified Point Cloud import. The tool uses Cintoo proprietary algorithm to create structure for the scan file according to the parameters provided by a user during the import process.
Watch tutorial video: How to Import Unified Point Clouds to Cintoo.
TABLE OF CONTENTS
Getting Started
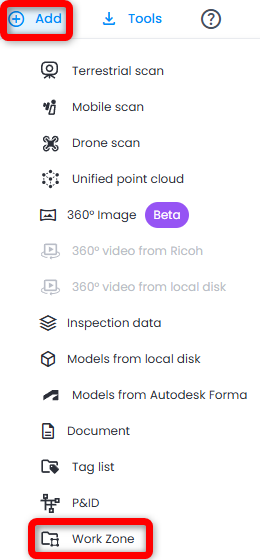
Navigate to the desired work zone in Work Zone Explorer, or create a new work zone clicking Add then Work Zone on the top right.
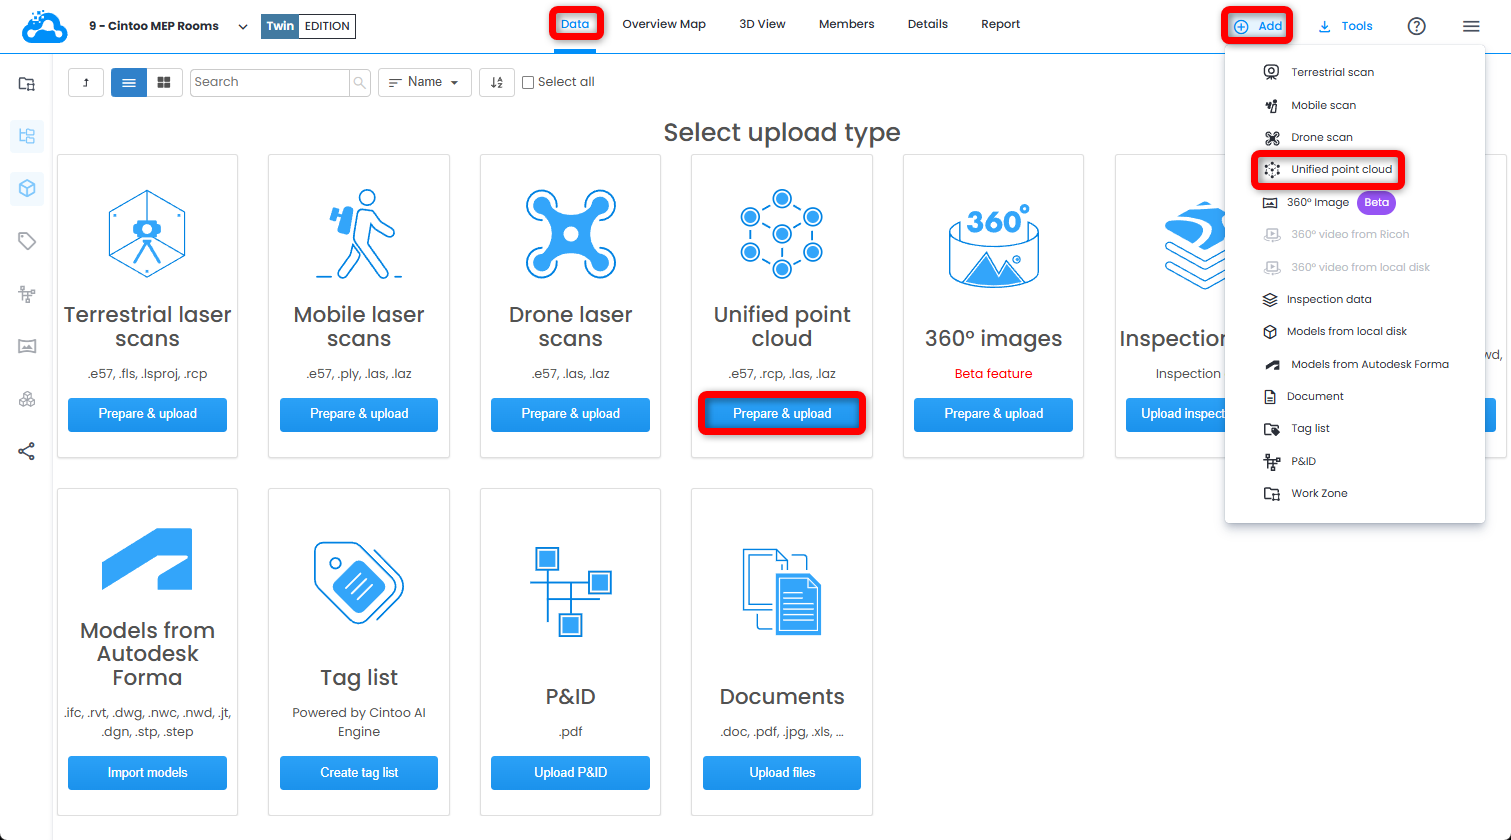
To access functionality open Data tab and click Prepare & upload on Unified point cloud tile or click Unified point cloud from Add drop-down menu on the top right. Cintoo Connect will launch.
Use cases
- Scan of the interior of the building when structure is absent or lost. This tool provides a unique opportunity to create a new structure for scan files without any additional effort embedded into Cintoo Connect solution.
- Multimodal approach to scanning e.g., having terrestrial/mobile/drone in one point cloud. The tool allows to create a structure that was lost during unification process of the source terrestrial scans (for example, when using Autodesk ReCap).
- Non-horizontal drone fly trajectory.
To upload a horizontal fly trajectory please use Upload Drone Data.
Input data
The following data types are supported for import with Unified Point Could option:
- E57 scans - only one point cloud, no multiple point clouds under one E57 scan file supported.
- unstructured RCP
- LAS and LAZ
Setup the import
- Parameters that are required to start importing scan data:

- File - path to the file on a local storage.
- Surface covered by each virtual vantage point - parameter that controls covered surface which directly affects the number of scan positions generated. More surface covered - less scan positions generated. It could be set both by entering the value in the box or moving the slider. Please remember that this parameter is an estimation due to the specifics of the algorithm.
- Elevation of the floors to be processed - parameter that controls elevation levels. Multiple levels could be introduced with the delimiter of ";" without spaces. For example, scanning was performed inside a building having multiple floors covered, then knowing each floor elevation a user can set them to be treated separately.
 Note: each floor level covers point cloud data 40cm above and below value set. If scanned terrain changes level beyond this limit, add another floor level to cover that area. Same principle applies to slopes or steps present in terrain.
Floor elevations are read in coordinate system of imported file. Measure floor level directly in file rather than using a rounded or design value - an inaccurate floor level is most common cause of import failure.
Please closely analyze scan data to choose the right floor levels. These 2 articles will help to do that within Recap or Cloud Compare. After scan data is imported into Cintoo please carefully review if all the data has been covered, if not add more floor levels to ensure the full coverage.
- Elevation above floor level - parameter that controls position of virtual scanner above floor level, 1.7m by default. It has two roles:
- bubble views are created at this elevation in a Cintoo project.
- point cloud is checked 10cm above and below this elevation for obstacles such as walls, ceilings, soffits, ducts or furniture. No scan position is placed where points are found at this height. For areas with low ceilings, use a lower value (for example 1.2m) rather than 0 - with 0, bubble views are created at floor level.
- Parameters that are shown for information purposes:
- Number of points - information about the total amount of points in the point cloud.

- Once Import button is clicked an estimation of the generated virtual vantage points (scan positions) and time estimation is shown in a pop-up window. Click Continue to proceed if the number of VVPs and time estimated are satisfactory.

- Estimated generated virtual vantage points - amount of scan positions to be generated according to Surface covered by each virtual vantage point parameter controlled by the user.
- Import time magnitude - estimated amount of time that would be required to import the data into Cintoo.
Troubleshooting
If import stops with error No positions computed. No scans have been uploaded to Cintoo, Cintoo Connect could not find any area with floor points at floor level and free space at elevation above floor level. Check that:
- floor level matches real floor height in file - measure it with Recap or Cloud Compare.
- areas at different heights each have their own floor level.
- elevation above floor level stays below ceilings, soffits and ducts. If ceilings are low, reduce it.
Limitations
Scans in E57 format are imported without 360 images. Images could be imported separately with Import 360 images option.
Was this article helpful?
That’s Great!
Thank you for your feedback
Sorry! We couldn't be helpful
Thank you for your feedback
Feedback sent
We appreciate your effort and will try to fix the article