This article outlines navigation in Cintoo VR Experience application both in Desktop and VR modes. Helping to get to know better the structure and visualization of data as well as main interface elements and tools available.
TABLE OF CONTENTS
Desktop Mode
First, click on Projects tab on the left and then choose a project to experience in VR. After the project is opened in Resources and Work Zones tabs choose objects to be activated.

Clicking on Log Out button at the top will redirect back to login menu.
Workzones and Resources
Workzones tab reflects project's work zone structure with number of objects indicators in blue.
To the left of each work zone there are clickable icons:
 Open eye icon means that a work zone is active
 Closed eye means that a work zone is inactive
Activate needed work zones to see their content in Resources tab.
Resources tab contains only active work zones with all scan and model type objects.
To the left of objects in Resources tab there are clickable icons:
- Open eye icon means that an object is active
- Closed eye means that an object is inactive
 Target allows to jump to an object directly from Resources tab
- Once finished setting up the right amount of data to be displayed, tabs could be minimized by clicking on Workzones and Resources once again.
Display Modes Panel
At the top of the screen in the middle Display modes panel is located, that controls visualization:

- RGB – colorful image taken from scanner data
- X-ray – transparent mode for comparison of multiple scans
- Surface - mesh generated from scan data
- Indoor – inside buildings mode allowing to darken the environment
Navigation
In Desktop mode of Cintoo VR Experience application the main and only option to navigate is from scan to scan, other options are not available. Hence, only blue highlighted scan or model is displayed, other active resources are just enabling scan location for scan-to-scan navigation.
Options
On the top panel open Options menu to change visualization parameters inside the application and choose additional settings.

- Pre-load Annotations - allows to fetch annotations for the selected project.
Similar to Fetch from cloud in Annotations. - VR Tunnel Vison - due to the navigation locomotion change users can activate this option to make movement smoother. Could also be activated from VR Tools menu.
- Visual quality - same setting as on the login page described in details in Discover the Application
- Scans quality - same setting as on the login page described in details in Discover the Application
VR Mode
Connection
- for Meta devices - after that establish connection with Meta Quest Link from the device by navigating to Settings, choosing Link, and clicking Launch. Or choose Link in Quick Settings menu.
More detailed instruction from Meta: Set up your Meta Quest with the Meta Quest Link - for other devices - establish connection with PC.
To switch to VR mode and start streaming to headset click on Virtual Reality in the low right corner.

Controllers
Main controller chosen when starting the application is called Navigation controller. Right-handed setting would have A and B buttons and is used to navigate in a project.
Second controller is called Tools controller. It has X and Y buttons, in the right-hand setting, and its use is functional.
Interface for navigating projects and data could be visualized by pressing B button. Navigation and visualization controls are the same as in Desktop mode.
Warning: while any interface menu is open, teleportation is not possible!

Navigation
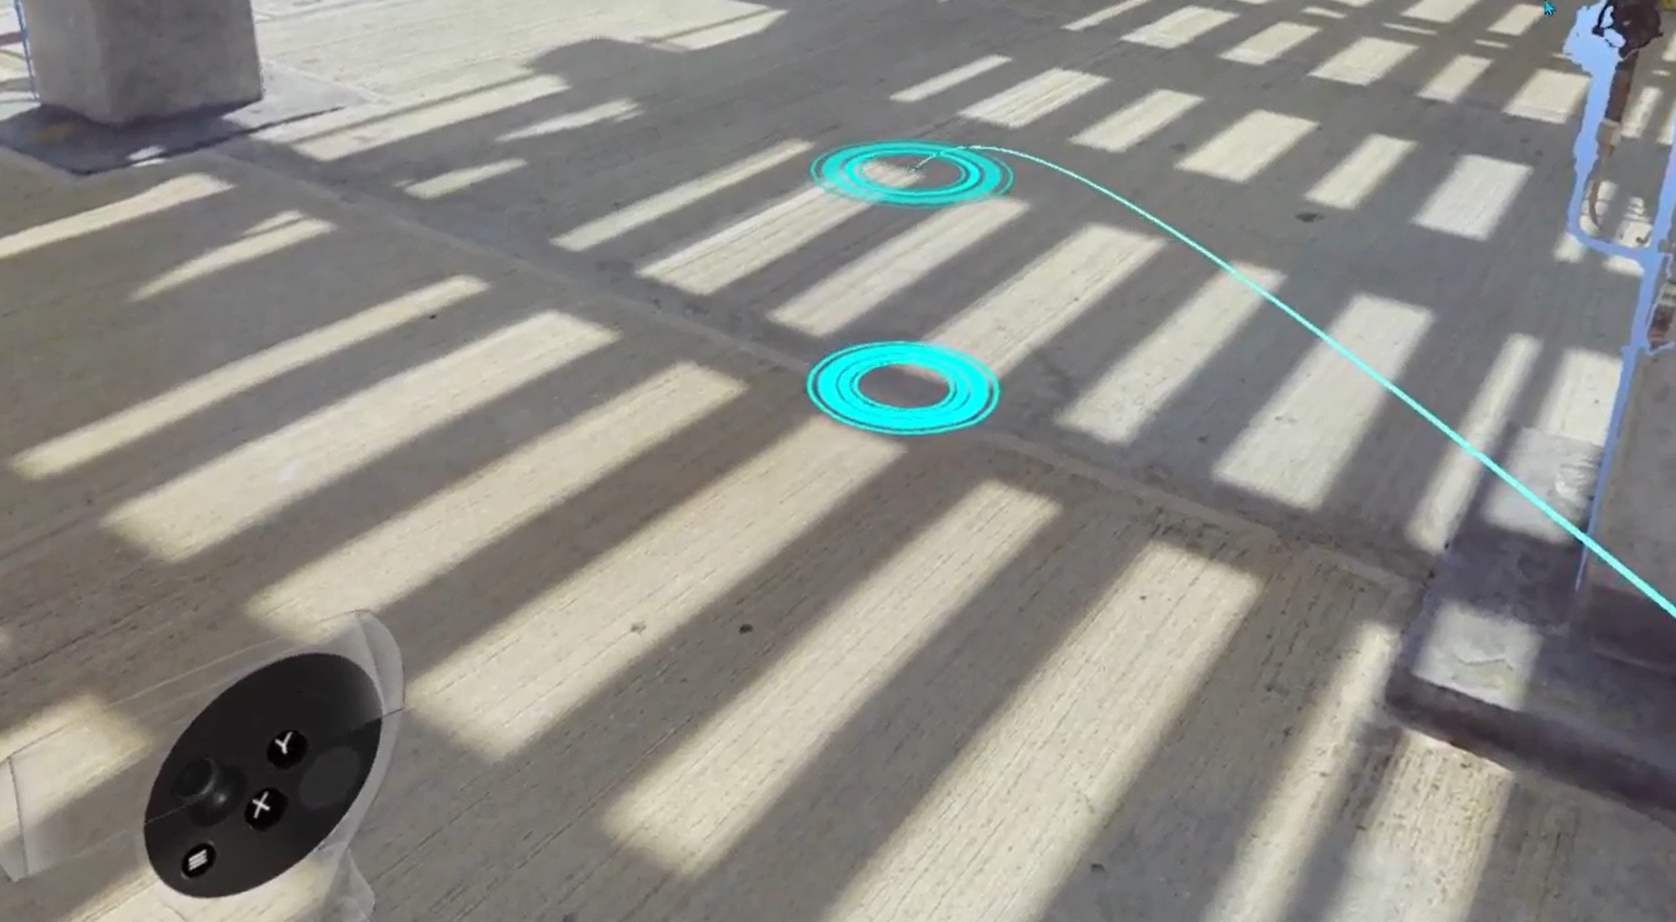
Navigation controller has a dynamic parabola traced from it. Parabola follows movements of the hand and changes respectively its length.
Discover 3 different ways to navigate in Cintoo VR Experience in VR mode:
- Scan-to-scan - pointing at scan location transforms parabola into a line and scan icon gets highlighted. Press Navigation controller trigger to go to scan location.

- Teleport with motion controllers – at the end of the parabola a target is displayed, while on the floor there is a red/blue grid. Another target is projected onto the floor to make navigation easier. When the target is moved closer to the surface of the floor at some point two targets merge and will stay in place. Press Navigation controller trigger to teleport to a chosen location.

- Vision control – to enter this mode drop hands along the body. Now transparent controllers are not visible, and control goes with the gaze. To go to a scan, orient the gaze at a scan icon and once it is highlighted press Navigation controller trigger.

In VR mode quick switching between display modes is possible by pressing X and Y buttons on Tools controller. Find more in navigation tips in Discover the application.
VR Tools Menu
This menu serves as the main control for enabling/disabling modes and accessing features.
To enter VR Tools menu click on the thumbstick on Tools controller.

- Set up Controllers Aim (more info Discover the application)
- Change Units that would be used in measurements and heightmap
- Obtain different Measurements (VR actions Measurements)
- Perform CAD models Manipulation (not yet activated!)
- Use Comparison tools (VR actions Comparison). Only Visual Check is available.
- Switch Display mode, including Heightmap, Backface and Indoor
- Activate Tags to review (VR actions Tags)
- VR Tunnel - smoother scan-to-scan navigation and teleportation. More details in Options
- Exit VR mode – to exit to Desktop mode
Heightmap

To lower or increase the low and high limits point at a number and pull or push correspondingly Navigation controller thumbstick.


To get back to default settings click Reset.
Indoor
Indoor mode replaces sky background with a black one. Could be used alongside
one of the other modes (RGB, XRay, Surface).

Was this article helpful?
That’s Great!
Thank you for your feedback
Sorry! We couldn't be helpful
Thank you for your feedback
Feedback sent
We appreciate your effort and will try to fix the article